Speech Assist - Summary
The Speech Assist Window at a Glance
The Speech Assist window is divided into five areas:
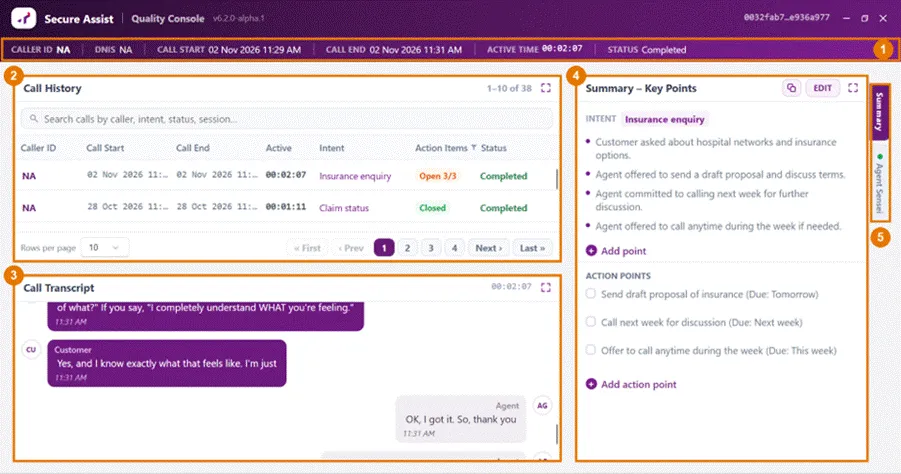
Figure 6: Speech Assist window showing a completed call
# | Area | Purpose |
|---|---|---|
1 | Call information bar | Details of the call that is selected or in progress (section 5). |
2 | Call History | All your calls, with search, sorting, filtering and paging (section 6). |
3 | Call Transcript | The conversation, word by word (section 7). |
4 | Summary / Agent Sensei panel | The call summary and action points, or the Agent Sensei analysis (sections 9 and 10). |
5 | Side tabs | Switch the right-hand panel between Summary and Agent Sensei. |
Window controls
• Minimize, Maximize / restore and Close buttons are at the top right. You can also double-click the purple title bar to maximize or restore the window.
• The text at the top right (for example “0032fab7…e936a977”) is the session ID of the selected call. Hover over it to see the full ID, which is useful if you contact support.
• Every panel has a maximize icon (⛶) in its top-right corner. Click it to enlarge that panel to fill the window, for example to read a long transcript, and click it again to restore the normal layout.
• When the window opens for the first time you may briefly see “Initializing speech engine... This only takes a moment.”
Call Information Bar
The purple bar below the title shows the details of the call that is in progress or selected in Call History.

Figure 7: Call information bar
Field | Description |
|---|---|
CALLER ID | The customer’s number or ID, read from your call application by Playwright integration (section 3.6). Shows NA when the call was started manually with the Start Call button. |
DNIS | The number the customer dialled, read by Playwright integration from the call application’s tab title. Shows NA when the call was started manually. |
CALL START | Date and time the call started. |
CALL END | Date and time the call ended. |
ACTIVE TIME | Length of the call (hh:mm:ss). With Playwright integration it is taken from your call application’s call timer. |
STATUS | |
Call status
Status | Meaning |
|---|---|
Active | The call is in progress and being captured. |
Processing | The call has ended. Its summary is being generated on your PC and the call is being saved. |
Paused | A long call whose summary is waiting for you to start it (see section 9.6). |
Completed | The call, its transcript and its summary are saved on the server. |
A field shows “—” when there is no value yet.
Call History
Call History lists all your captured calls, newest first. Click any row to load that call’s details, transcript, summary and Agent Sensei analysis into the rest of the window.
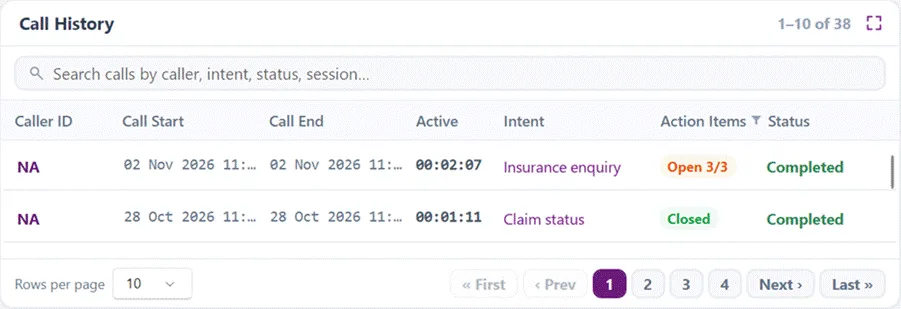
Call History lists all your captured calls, newest first. Click any row to load that call’s details, transcript, summary and Agent Sensei analysis into the rest of the window.
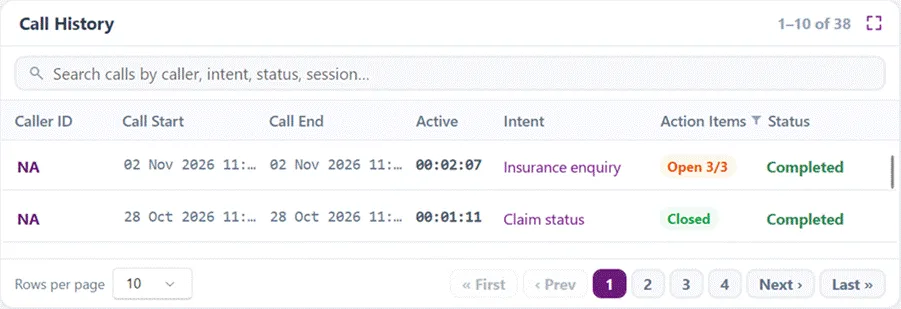
Figure 8: Call History panel
Call History Columns
Column | Description |
|---|---|
Caller ID | The customer’s number or ID (from Playwright integration; NA for manually started calls). |
Call Start / Call End | When the call started and ended. |
Active | Duration of the call. |
Intent | A short 1–3 word category for the call, such as “Insurance enquiry” (see section 9.2). It is blank when the call could not be matched to one of your organisation’s configured intents. |
Action Items | Progress of the call’s follow-up tasks (see 6.3). |
Status | Active, Processing, Paused or Completed (see 6.4). |
Click the Caller ID, Call Start, Call End, Active or Intent column header to sort by that column; click again to reverse the order. An arrow shows the current sort.
Searching
Type in the box “Search calls by caller, intent, status, session…” to filter the list instantly. The search matches the caller ID, call times, active time, intent, status, action item text and session ID.
Action Items and the Action Items filter
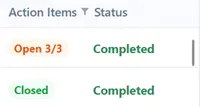
Figure 9: Action Items column: an open call (Open 3/3) and a closed call
Shown as | Meaning |
|---|---|
Open 3/3 (orange) | The call has action points that are not done yet: 3 open out of 3 in total. |
Closed (green) | All the call’s action points are ticked off, or the call has none. |
— | The call has no summary yet. |
The Action Items column header is also a filter. Click the funnel icon (⧩) next to it and choose All calls, Open or Closed. A tick marks the current choice, and the funnel turns purple while a filter is active. This is a quick way to find calls where you still have follow-up work to do.
Status column
• ● Active (green): the call is in progress right now.
• Processing: the summary is being generated and the call saved.
• Paused with an orange ▶ Summarize button: a long call whose summary has not been started yet. Click Summarize to generate it now.
• Completed: everything is saved.
Paging
Use Rows per page (10, 25, 50 or 100) and the page buttons (« First, ‹ Prev, page numbers, Next ›, Last ») to move through your calls. The counter at the top right, for example 1–10 of 38, shows which calls you are viewing. Speech Assist remembers your rows-per-page choice.
If nothing matches, the list says so, for example “No calls match your search.” or “No calls on this page with open action items.”
Call Transcript
The Call Transcript shows the conversation as text. During a call it fills in live as you and the customer speak. For past calls, select the call in Call History to load its saved transcript.
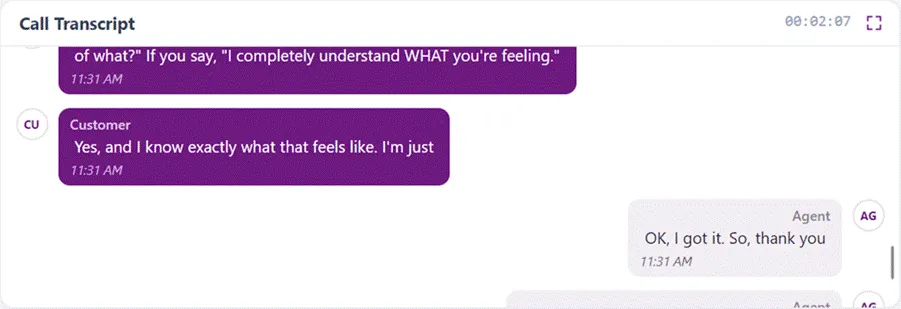
Figure 10: Call Transcript: Customer (left, purple) and Agent (right, light)
Reading the transcript
Element | Description |
|---|---|
Customer bubble | Left side, purple, with a CU badge and the label “Customer”. |
Agent bubble | Right side, light background, with an AG badge and the label “Agent”. |
Time | During a live call each line shows the time it was spoken, for example 11:31 AM. |
Recording indicator | A red pulsing Recording label appears in the panel header while the call is being captured. |
Call timer | The time at the top right of the panel, for example 00:02:07, is the call duration. |
Call markers | The transcript begins with “Call started on …” and ends with “Call ended on …”, with the date and time. |
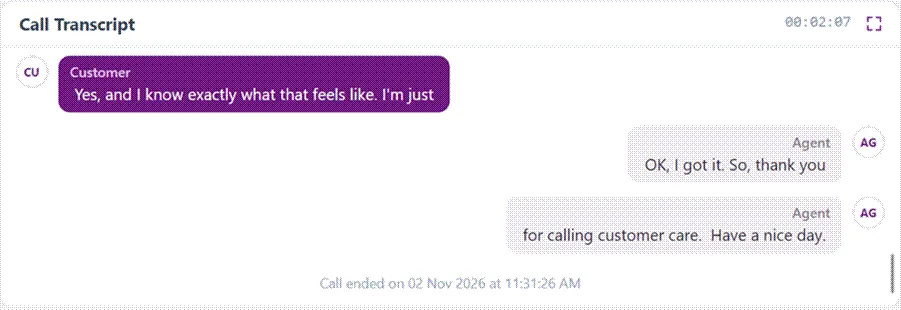
Figure 11: End of a transcript, with the “Call ended on” marker
Profanity masking
When profanity filtering is enabled by your administrator, offensive words are automatically masked in the transcript with one asterisk per letter (for example, “****”). This applies to both live and saved transcripts.
Loading a saved transcript
When you open a past call, the transcript shows “Loading transcript…” for a moment. If it can’t be loaded (for example, because of a network issue), a message asks you to select the call again to retry.
Non-Compliant Words
Your organisation can define a list of non-compliant words: words or phrases that agents should not use with customers (for example, promises or wording that is not allowed in your industry).
How it works
1. Your administrator maintains the list of non-compliant words centrally. Agents do not need to set anything up.
2. During a call, Speech Assist checks the transcript for these words as the conversation happens.
3. When a non-compliant word is detected, Speech Assist records it with the call and raises an event for your supervisor.
4. Your supervisor can review the event, see the word highlighted in the saved transcript and listen to the related audio clip.
What you see as an agent Non-compliant words are not highlighted on your own screen during the call. Your transcript shows the conversation as normal, and the detection is visible to your supervisor for quality review. |
|---|
Non-compliant word detection is separate from the Compliance Breach indicator in Agent Sensei (section 10.5). Agent Sensei assesses the call as a whole, while non-compliant word detection looks for specific words from your organisation’s list.
Call Summary: Intent, Key Points and Action Points
When a call ends, Speech Assist reads the transcript and writes a summary in the Summary – Key Points panel. To see it, select Summary in the side tabs on the right edge of the window.
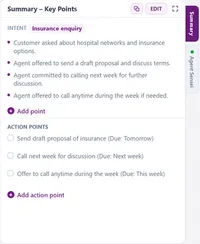
Figure 12: Summary – Key Points panel
When does the summary appear?
• While it’s being generated, the panel shows a progress bar with “Generating summary...” (or “Waiting to summarize...” if another call is being summarized first).
• The summary normally appears within about 1–3 minutes of the end of the call. It doesn’t wait for the Agent Sensei analysis.
• Until a summary exists, the panel says “No summary available yet.”
Intent
The INTENT chip at the top is a short category for the call, typically one to three words, for example “Insurance enquiry”, “Claim status” or “Address change”. Its purpose is to categorise the call for quick grouping and searching, not to describe it in detail; the details are in the key points below.
• The intent is chosen from the list of intents configured by your organisation, and is shown spelled exactly as configured.
• If the call can’t be matched to one of the configured intents, the intent is left blank. A blank intent is expected for calls that don’t fit any category.
• The intent also appears in the Intent column of Call History. Sort by that column to group calls of the same type together, or type an intent in the search box to find all calls of that type.
For administrators The intent list is configured per team in OCM, under Team Template → Features, with the feature SA_CALL_INTENTS (for example [“Card dispute”, “Balance enquiry”, “Address change”, “Loan enquiry”]). Up to 100 intents are supported. Intents that describe clearly different requests work best; very similar intents are harder to tell apart. |
|---|
Key points
Below the intent, a short bulleted list captures the most important points of the conversation: what the customer asked for and what you offered or committed to.
9.4 Action points
The ACTION POINTS section lists the follow-up tasks agreed during the call. When a deadline was mentioned, it is shown in brackets, for example “Send draft proposal of insurance (Due: Tomorrow)”. If the call had no follow-ups, the panel says “None identified.”
• Tick the box next to an action point when you have completed it. The item is crossed out and saved immediately; you don’t need to press Edit.
• Ticked items update the Action Items count in Call History (for example, from Open 3/3 to Open 2/3, then to Closed).
Editing and copying the summary
Button | What it does |
|---|---|
Copy (⧉) | Copies the whole summary to the clipboard so you can paste it into your CRM, an email or a case note. A “Summary copied” message confirms it. |
EDIT | Turns on edit mode. Available once the call is Completed. |
DONE | Shown in place of EDIT while editing. Saves your changes to the call record. |
+ Add point | Adds a new key point. In edit mode, type it in the “New point… (Enter to add)” box and press Enter. |
+ Add action point | Adds a new action point. Type it in the “New action point… (Enter to add)” box and press Enter. |
× | Shown next to each item in edit mode. Removes that key point or action point. |
To edit a summary:
1. Select the call in Call History and make sure its status is Completed.
2. Click EDIT.
3. Add new points with the “New point…” and “New action point…” boxes (press Enter after each), or remove points with ×.
4. Click DONE. You’ll see “Saving summary…” and then “Summary saved”.
Tip Anything you have typed in a “New point” box but not yet added with Enter is still saved when you click DONE. |
|---|
Long calls: Summary paused
For long calls (roughly over 12–13 minutes of conversation), generating the summary on your PC takes longer. So that it doesn’t slow you down at an inconvenient moment, Speech Assist pauses and lets you choose when to start it:
• The call shows Paused in Call History, with a ▶ Summarize button.
• The summary panel shows “Summary paused – This is a long call, so its summary may take a few minutes to generate. Start it when you’re ready.” with a ▶ Generate summary button.
• Click either button to start. The summary is generated in the background, and the call is then saved to the server as usual.
Important A paused call is stored only on your PC until you start its summary. Start the summary when convenient so that the call is saved to the server. |
|---|
If a summary could not be generated
If something goes wrong, the panel shows “Summary not generated” with a ▶ Regenerate summary button. Click it to generate the summary again from the saved transcript; it runs in the background however long the call is. If a summary took too long on your PC and was stopped, the panel explains this and offers to generate it again.