Secure Assist - Lets Start
Speech Assist is controlled by two buttons in the main SWFH window. Both appear only when Speech Assist is enabled for you.
Button | Appearance | What it does |
|---|---|---|
Start Call | Microphone icon with a green border | Opens the Speech Assist window and starts listening to the call. Tooltip: “Start Call”. |
End Call | Same microphone icon, now with a red border | Stops listening and starts preparing the call summary. Tooltip: “End Call”. |
Open Neuron Edge | Round shutter-style icon to the right of the microphone | Brings the Speech Assist window to the front without starting to listen. Use it to review past calls, transcripts, summaries and action items. |
Start Call: ready to listen (green)
When you are ready to take a call, click the microphone button. The green border shows that Speech Assist is ready and not capturing audio.

Figure 2: Start Call button (green border): ready, not capturing audio
End Call: listening to the call (red)
While the call is being captured, the border turns red. The Speech Assist window opens, and the transcript shows a red pulsing Recording indicator. Click the button again to end the call.

Figure 3: End Call button (red border): audio is being captured
Open Neuron Edge: open the window without capturing
Click the Open Neuron Edge button to show the Speech Assist window at any time, for example to finish an action item from yesterday’s call. Audio capture is not started.

Figure 4: Open Neuron Edge button (highlighted in yellow): shows the Speech Assist window without capturing audio
A call from start to finish
1. Click the green Start Call button. The Speech Assist window opens and the button turns red. (With Playwright integration, simply take the call in your call application; the call is detected automatically. See section 3.5.)
2. Talk to your customer. The Call Transcript fills in live, with the customer on the left and you on the right.
3. When the call is over, click the red End Call button. The button turns green again. (With Playwright integration, ending the call in your call application ends it in Speech Assist too.)
4. The call appears in Call History with status Processing while its summary is generated on your PC (usually 1–3 minutes).
5. The Summary – Key Points panel shows the intent, key points and action points as soon as they are ready.
6. Once the call is saved to the server, its status changes to Completed. You can now edit the summary, and the Agent Sensei analysis appears when it is ready.
Closing the window Clicking × in the Speech Assist window only hides it; Speech Assist keeps running. Use Open Neuron Edge to bring it back. |
|---|
Automatic call detection: Playwright integration
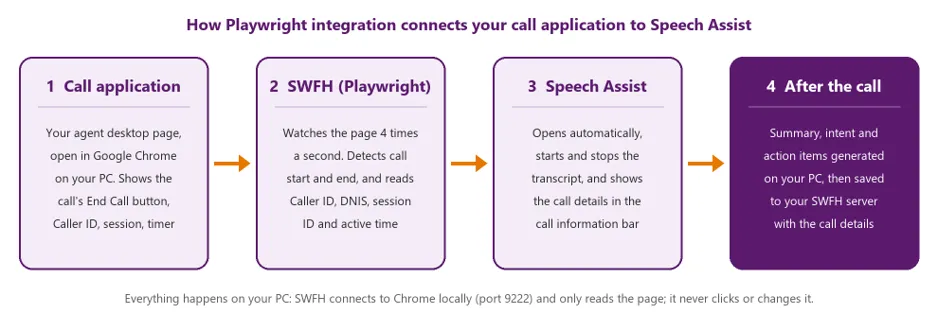
Speech Assist can be connected to the call application you already use on your PC, for example your contact centre’s web-based agent desktop running in Google Chrome. This connection is called Playwright integration. When it is set up:
• You don’t need to click Start Call or End Call. Speech Assist starts listening when a call begins in your call application and stops when the call ends.
• The call details come straight from your call application. The Caller ID, DNIS, session ID and active time that you see in the call information bar and in Call History are read from the call page, so every call is recorded with the right customer details.
• Nothing changes in your call application. SWFH only reads the page; it never clicks buttons, types or changes anything on it.
Important: call details depend on Playwright integration The Caller ID, DNIS and session ID shown in Speech Assist are available only through Playwright integration. When a call is started manually with the Start Call button, Speech Assist has no access to your call application, so these fields show NA (as in the screenshots in this guide) and a new session ID is generated by SWFH. |
|---|
Call details brought in from your call application
Detail | Where SWFH reads it | Where you see it in Speech Assist |
|---|---|---|
Caller ID | The caller ID element on the call page | CALLER ID in the call information bar, and the Caller ID column in Call History (searchable) |
DNIS | The browser tab title, from the text “S: <number>” (for example “S: 40000”) | DNIS in the call information bar |
Session ID | The session ID element on the call page | Top-right of the Speech Assist window (hover for the full ID), and searchable in Call History. It links the Speech Assist record to the same interaction in your contact centre systems. |
Call direction | The direction element on the call page (for example inbound or outbound) | Saved with the call record |
Active time | The call timer on the call page, read when the call ends | ACTIVE TIME in the call information bar and the Active column in Call History |
Call start and end | The moments the call is detected as started and ended (see 3.7) | CALL START and CALL END, and the transcript’s “Call started on” / “Call ended on” markers |
What happens during a call
1. After you sign in to SWFH, it connects locally to Google Chrome on your PC and finds the tab that shows your call application (the tab whose address contains the configured page address). If Chrome or the tab isn’t open yet, SWFH keeps checking every few seconds and connects as soon as it is.
2. SWFH checks the call page four times a second for the call application’s End Call button (identified by its position on the page and its label text).
3. Call starts: when the End Call button appears and becomes clickable, SWFH reads the Caller ID, session ID and direction from the page and the DNIS from the tab title, opens Speech Assist and starts the live transcript.
4. Call ends: when the End Call button has disappeared for one second, SWFH reads the call timer from the page, stops listening and starts generating the summary.
5. Safety net: if the call tab is closed, reloaded or crashes during a call, the call is ended and saved automatically. SWFH then reconnects to the page by itself.